Search This Blog

Showing posts with label handmade. Show all posts

Thursday, May 20, 2010

My Mermaid is Finished!!!!

     I finally finished my mermaid polymer sculpture! I think it turned out pretty great :) And I even used real seaweed for it! I started it on Christmas break, and I finished it on Monday.... that's sad. It took me that long! Most of it was, me getting tired of working on it and wanting to start something new. But alas I am done!

     I finished it on Monday because I wanted to put it into my portfolio(that was due on Monday) that I had to submit in order to apply for a scholarship! I really hope either the memory stick, or the CD I submitted works. I wasn't sure if the CD got burned correctly, so I dropped off a memory stick with it.

     Note to self: Submit things ahead of time, instead five minutes before the deadline! That way you can make sure the CD works!!!!!  

This project was posted on:


Tuesday, May 11, 2010

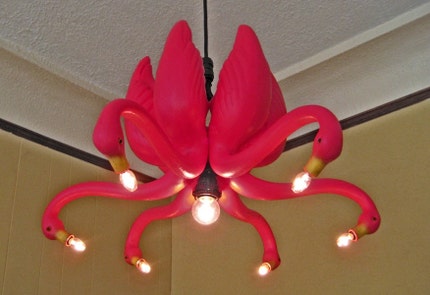
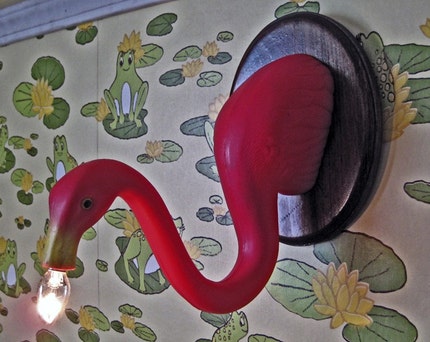
The Funnest Lighting!!

These lights were just too much fun for me to not blog about them! I am really tempted by these lights.... They are pretty much amazing!!! I really like the Flamingo Chandelier, but I think my roof is too low anyway. As for the Lawn Flamingo Wall Sconce I think that I am already lacking wall space *sigh*. If you would like to check them out just click HERE!


Monday, March 29, 2010

Clothing as art?

     I was very excited to find that there was a clothing show at the Gallery IS (yes IS, is the name of it). But when I went to check it out last Saturday, I was sadly disapointed. Why is it that I am always disapointed?! I don't think I expect anything too terribly huge. I suppose it is still too much to expect. Anyways, I got there to find that the "show" was in a tiny litlle corner, of the rather small gallery.
    
     The artist was Valerie Turbak, of whom I took a "clothing design" class from once upon a time. I guess it was all right, if you had very little sewing skills, and didn't really want to learn real clothing design. Alas! Once again my expectations were too high *sigh*. Anyway, at least it made me want to learn the real stuff. So I marched to the college library and got out a pile of books on pattren drafting! You can visit her Etsy shop here. There is a video interview you can watch here. And now, on with the pictures!
A top made from a button down.
Screen prints on paper.
Another remade button down.
More screen prints on paper.
Bags she made, with screen prints.
More screen prints on paper.
Still another (sorry about the glare)

Her artist statement.

Thursday, March 25, 2010

How to Make a Initial Stamp!

If you have ever wanted to make your own stamp....well here it is!
Here is a list of what you will need:
  1. An old Gutermann thread spool
  2. A Exacto knife
  3. Something to cut on (I just used my notebook, but you may want to use a cutting mat to be safe)
  4. A pen or pencil
  5. A eraser (I used a EZ Erase by buffalo, you don't want one thats too stretchy, more crumbly and sort of hardish....if any of that made sense)
  6. Some ink or paint to try it out with!
  7. Some paper to stamp on
The ingredents.

Start by tracing the shape of the spool on to the eraser.

Cut out the shape, being sure to go directly down. Shave bits off, untill it fits snugly in the end.

Draw your initial backwards on the eraser. Make sure that it's backwards now! Because if it is the right way now, when you stamp it will be backwards!!! Ahhhh! Oh no! So avoid that.
I thought I took a picture of the cutting away of the exess, but I guess I didn't. Basicly just cut staight down around the shape of the letter. Then horizontaly cut up to that line, and pull out the bits that should now be loose. After that you pop the eraser into the spool, and you are done! Now to try it out, I just used some paint applied with a paint brush, because I was too lazy to go dig out the ink pads (it's a lot of digging, and I mean a LOT)   
Stamp, stamp, stamp, stampity stamp! Yay! It worked!

I cut out a circle of craft foam and glued it on the top with Weld Bond. Before I glued it on though, I stamped the "J" on the foam, just because it makes it looks so much cuter! Enjoy your stamps :)

Tuesday, February 2, 2010

My first tweet! + Pictures of my latest earrings!!!

     I was checking my email today, and there I see this one entitled "OH MY GOODNESS JANELLE!‏". So I opened it, and here my friend tells me someone tweeted about this choker/bracelet! She was really excited, but I think I still topped her in that department :) Shrieeeeeek!!!! (That was a shriek of joy by the way) I am so excited!!!!
     So now I will leave you with pictures of my latest earrings. I probably spent too much time taking pictures of them, but I love how they looked in the spot of light!!  And check out the great story that goes with them here.